Winter bulletin board
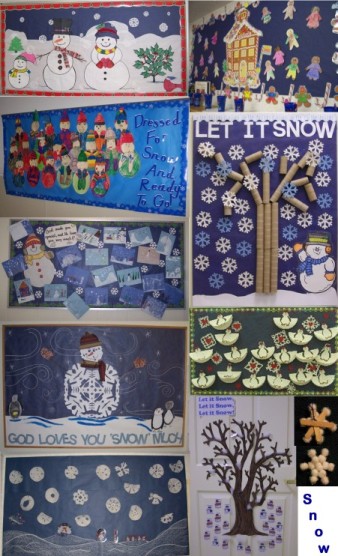
On this winter bulletin board page you will see many different pictures. Starting on the lefthand side and going down you will see...
- This winter bulletin board can be figured out easily from this picture. Make the scene using white bulletin board paper. Add a holly bush and a cardinal on. This board has a family of three, each figure is outlined in black so it will be easier to distinguish it.
- The next one is ‘Dressed for Snow and Ready to Go!’. The body, head, mittens and hat were already pre-cut out by us but if your working with older children you can just give them the paper so that they can start from scratch themselves. Each child drew the arms on the body first, then colored their coat and arms. They drew their face (drawing the hair later) and colored their hats and mittens. Glue the head onto the body. Glue the hat on the head then add hair. Glue mittens to the end of the arms that you drew onto the body. When you’re putting together the display it looks better to put the bodies close together instead spreading them out.
- ’God made you special, and He loves you very much!’ The kids drew a winter scene on dark or light blue construction paper using chalk. We added a winter 'man' and the title of the bulletin board.
- The center of this winter bulletin board is a giant flake that was made using white bulletin board paper. A smaller flake was made using the same paper. And scraps of material were used for the scarf and hat. Penguins were used as extras on this board but I think any critter you might have would look okay here, just slap on a hat and mittens and you’re all set. At the bottom of the board is the title of this board, ‘God loves you snow much.’
- On this board I just drew the scene with chalk, added figures that I purchased at the store. After this board was put up I read the book ‘Snip, Snip, Snow’ to the class and they each cut out their own flake to be put on the board.
- At the top of the next column is a gingerbread house. Each child decorated their own gingerbread boy or girl.
- The tree underneath that as you can see was made of toilet paper and paper towel rolls. The flakes were cut out using the Accucut machine.
- These penguins are glued to paper plates that have been folded in half. Snowflakes were added to the background.
- This tree can be found elsewhere on this site decorated in different ways. Here I added cotton (you know that wintery fluffy white stuff) to some of the limbs and the base of the tree. I also put a 'man' or 'woman' with each child’s name on it for each child in the room. At the top of course is that all important winter-time theme.
- Finally on the bottom is a front and back view of a flake ornament that my son made. It was made by gluing three small craft sticks together (as shown). On the front he glued on small white pom-poms. A looped string was also glued to the back so that it could be hung onto the tree.
The handmade snowflake at the end could be used with any of the above bulletin boards or displays to give it more of a 3D look.
Also using ‘real’ items such as real hats or scarves where you can just adds to the effect.

Leave the winter bulletin board page and return to the seasonal page.

|
